Android Testing with Espresso — part 6
This post was translated from Portuguese using generative AI.
In the previous post, we learned how to make assertions and interactions in a recyclerview. If you want to start from this post, use the ‘part_5’ branch of the project.
In this part of the tutorial, we will see how to make a custom matcher and learn how to handle runtime permissions. For this, it was necessary to make an adjustment in the initial project. Check this change in the ImageAndTextView.java (line 47) and in the UserDetailsActivity class. Understand this change well before proceeding.
First scenario
The UserDetailsActivity has the following layout:

We have the user’s photo, name, phone, email and address. This might be the first scenario: check if all the information appears on the screen. As it is a simple scenario, I will leave it as a task for you to implement.
Second scenario
Except for the name, the user will not always have all this data and, if they do not have a phone, email or address, the message “No info available.” should appear, in red. As shown in the image below:

Then, another scenario is: check if the text “No info available.” appears when the user does not have an email, telephone or address.
@Test
public void whenEmailIsMissing_shouldDisplay_noInfoMessage() {
    mActivityRule.launchActivity(createIntent(true));
    onView(withId(R.id.user_details_image)).check(matches(isDisplayed()));
    onView(withId(R.id.user_details_name)).check(matches(isDisplayed()));
    onView(allOf(
            withId(R.id.image_and_text_image),
            hasSibling(withText("No info available."))))
            .check(matches(isDisplayed()));
}

private Intent createIntent(boolean missingInfo) {
    return new Intent().putExtra(UserDetailsActivity.CLICKED_USER, getMockedUser(missingInfo));
}

private UserVO getMockedUser(boolean missingInfo) {
    final String mock = missingInfo ? Mocks.USER_MISSING_INFO : Mocks.USER;
    return UsersApi.GSON.fromJson(mock, UserVO.class);
}
Nothing new in this test, just starting the UserDetailsActivity with an intent that contains a user without an email (Mocks.USER_MISSING_INFO) and checking if the text “No info available.” is visible. However, we haven’t tested if the text colour is red. To do this, let’s create a custom matcher.
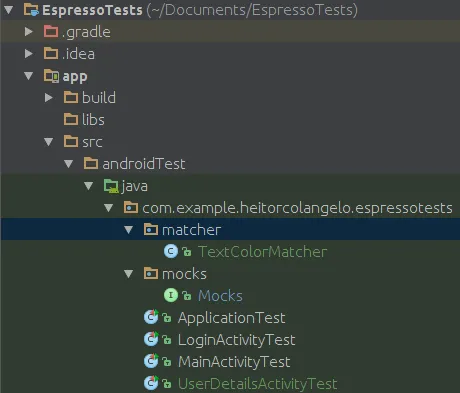
Create a matcher package and a TextColorMatcher class, as shown in the image below:

The TextColorMatcher class will look like this:
public class TextColorMatcher {

    private TextColorMatcher(){}

    public static Matcher<View> withTextColor(@ColorInt final int expectedColor) {
        return new BoundedMatcher<View, TextView>(TextView.class) {
            int currentColor = 0;
            @Override
            public void describeTo(Description description) {
                description.appendText("expected TextColor: ")
                        .appendValue(Integer.toHexString(expectedColor));
                description.appendText(" current TextColor: ")
                        .appendValue(Integer.toHexString(currentColor));
            }

            @Override
            protected boolean matchesSafely(TextView item) {
                if(currentColor == 0)
                    currentColor = item.getCurrentTextColor();
                return currentColor == expectedColor;
            }
        };
    }
}
- Line 5: we declare the withTextColor method that receives a color as a parameter and returns a _Matcher
._ - Line 6: we create a new instance of the BoundedMatcher class, which will allow the creation of our view matcher.
- Line 7: we initialize the variable that will store the current color value of our textview’s text.
- Lines 8 to 13: we override the describeTo method. It is in this method that we will assign to the object of the Description type, what will be displayed in the log if the assertion fails.
- Lines 16 to 21: we override the matchesSafely method, which is where we will make the comparison between the current color of the TextView, and the color that we expect it to have.
Now all we have to do is use our custom matcher in the test.
@Test
public void whenEmailIsMissing_shouldDisplay_noInfoMessage() {
    mActivityRule.launchActivity(createIntent(true));
    onView(withId(R.id.user_details_image)).check(matches(isDisplayed()));
    onView(withId(R.id.user_details_name)).check(matches(isDisplayed()));
    onView(allOf(
        withId(R.id.image_and_text_image),
        hasSibling(withText("No info available.")))
    ).check(matches(isDisplayed()));

    onView(allOf(
        withText("No info available."),
        withTextColor(ContextCompat.getColor(mActivityRule.getActivity(), R.color.red)))
    ).check(matches(isDisplayed()));
}
To ensure that it is working, try passing a different colour to check if the test fails. Also check if the error message is the one that was set up in our custom matcher.
**NoMatchingViewException**: No views in hierarchy found matching: (with text: is “No info available.” and **expected TextColor:** “ffff4081” **current TextColor:** “fff44336”)
Another detail of this screen is that each information item triggers an action when clicked:
- Clicking on the phone number initiises a call;
- Clicking on the email opens a new message to be sent to the user;
- Clicking on the address opens Google Maps where it’s possible to plot a route.
Let’s write a test for the phone number click. I’ll leave the other two tests for you to implement.
Runtime Permissions
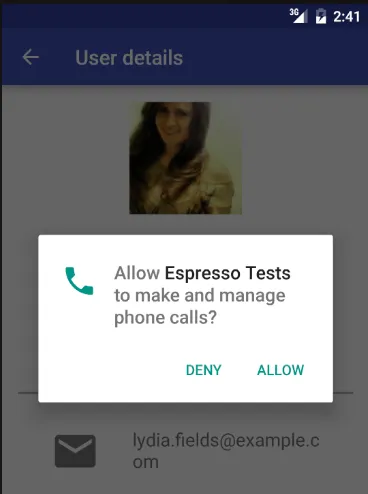
Starting from Android 6, permissions are requested during runtime. This affects our tests, because we have to handle this particular situation separately.

For example, we will encounter issues if we run a test like this:
@Test
public void clickOnPhone_shouldStartPhoneIntent() {
    mActivityRule.launchActivity(createIntent(false));
    Intents.init();
    intending(hasAction(Intent.ACTION_CALL))
            .respondWith(new Instrumentation.ActivityResult(Activity.RESULT_OK, new Intent()));
    onView(withId(R.id.user_details_phone)).perform(scrollTo(), click());
    intended(hasAction(Intent.ACTION_CALL));
    Intents.release();
}
On devices earlier than Android 6, this test passes, but on devices with a Marshmallow version onwards, it will fail.
We also can’t get Espresso to click on the “Allow” button, as this dialog is out of the application’s context.
For this type of interaction, we will use the UiAutomator, as it allows us to execute interactions with Android apps. If you want to know better the difference between Espresso and UiAutomator, take a look at this discussion on StackOverflow.
To start, add this setup in your build.gradle file:
// UiAutomator
androidTestCompile "com.android.support.test.uiautomator:uiautomator-v18:2.1.2"
Synchronise the project, you will likely see this error:
Manifest merger failed :
**uses-sdk:minSdkVersion 16 cannot be smaller than version 18 declared in library ... uiautomator-v18:2.1.2
**...
**Suggestion:
use tools:overrideLibrary=”android.support.test.uiautomator.v18" to force usage**
To solve this problem, just follow the suggestion from the error log itself: “use tools:overrideLibrary=”android.support.test.uiautomator.v18 to force usage”.
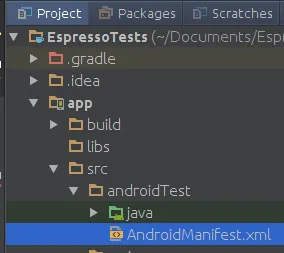
First, create a new file AndroidManifest.xml inside your androidTest folder.

Within this file, place the code below:
<?xml version="1.0" encoding="utf-8"?>
<manifest
    xmlns:tools="http://schemas.android.com/tools"
    package="com.example.heitorcolangelo.espressotests">

<uses-sdk tools:overrideLibrary="android.support.test.uiautomator.v18"/>
</manifest>
When the Manifest merge occurs, the error will not occur again.
I got this tip from this answer on stack overflow. What happens is that the UiAutomator lib has minSdk 18, and our app has minSdk 16. But as we will use the UiAutomator only for tests, there is no problem in overwriting this value in the Manifest. I did the tests with this change in emulators with API 16+ and everything worked normally.
Continuing with our test, we have the UiAutomator set up correctly. We will use it to interact with the Android permission dialog.
/**
 * From: https://gist.github.com/rocboronat/65b1187a9fca9eabfebb5121d818a3c4
 */
public class PermissionUtils {
    private static final int PERMISSIONS_DIALOG_DELAY = 3000;
    private static final int GRANT_BUTTON_INDEX = 1;

    public static void allowPermissionsIfNeeded(String permissionNeeded) {
        try {
            Context context = InstrumentationRegistry.getTargetContext();
            if (Build.VERSION.SDK_INT >= Build.VERSION_CODES.M && !hasNeededPermission(context, permissionNeeded)) {
                sleep(PERMISSIONS_DIALOG_DELAY);
                UiDevice device = UiDevice.getInstance(getInstrumentation());
                UiObject allowPermissions = device.findObject(new UiSelector()
                        .clickable(true)
                        .checkable(false)
                        .index(GRANT_BUTTON_INDEX));
                if (allowPermissions.exists()) {
                    allowPermissions.click();
                }
            }
        } catch (UiObjectNotFoundException e) {
            System.out.println("There is no permissions dialog to interact with");
        }
    }

    private static boolean hasNeededPermission(Context context, String permissionNeeded) {
        int permissionStatus = ContextCompat.checkSelfPermission(context, permissionNeeded);
        return permissionStatus == PackageManager.PERMISSION_GRANTED;
    }

    private static void sleep(long millis) {
        try {
            Thread.sleep(millis);
        } catch (InterruptedException e) {
            throw new RuntimeException("Cannot execute Thread.sleep()");
        }
    }
}
This class I found at this gist. Let’s break it down:
- Line 11: We check if the Android version is 6 or higher, and if the permission we need has not been granted yet.
- Line 13: We retrieve the singleton instance of the class UiDevice. This will allow interaction with the device.
- Line 14 to 17: We search for the “Allow” button of the permission dialog. For this, we create a UiSelector object and call some of this class builder’s methods to set up our object. One of these methods is index(int index). This method will set the ID of the button we want to click. In the case of the dialog, the “Allow” button value is 1. If we wanted to click on “Deny” we would use index = 0.
- Line 18 and 19: If the “Allow” button was found, we click on it.
In our test, we will call the allowPermissionsIfNeeded method from PermissionUtils right after the phone click. It will look like this:
Try running the test, check if it passes. If something went wrong, go back to the previous steps or leave a comment so I can help.
There are other scenarios to test on this screen, but the required knowledge for it has been covered in this tutorial. So, get to work. 😉
At the end of this stage, your code should look similar to the branch ‘part_6’.